Relevant Products: Signature Manager Outlook Edition
WARNING! The following products were discontinued on 30 September 2022:
- Exclaimer Signature Manager Outlook Edition
- Exclaimer Signature Manager Exchange Edition
The end of Support for these products is 30th September 2024.
For more information, please see the Discontinued Questions and Answers page.
Setting up ExSync
To deploy signatures from Exclaimer Signature Manager Outlook Edition to each user's computer, an agent named ExSync needs to be running on each client machine. ExSync is designed to update Outlook signatures regularly, using minimal processing/memory resources.
There is no actual installation required for this agent.
You can automate the process of running ExSync on client machines using a Group Policy Object (GPO) or a logon script. Users will not be aware of the agent running during the normal operation of their machine.
How do I obtain a copy of ExSync?
Once you have completed the installation process and the setup wizard, the ExSync agent is automatically copied to your specified deployment share, from where it is run. However, to use ExSync, you need to:
Setting the Update Mode for ExSync
Using Exclaimer Signature Manager Outlook Edition settings, you can set the mode in which Outlook policies are applied to user computers via ExSync.
To do this, follow the steps below:
- Within the Exclaimer console, select the signature deployment policies branch of the console tree.
- From here, select the required deployment policy. A default deployment policy is created automatically when Exclaimer Signature Manager Outlook Edition is installed and a deployment share is specified in the setup wizard. You can add additional deployment policies.
- Select the Settings tab to view settings for the selected deployment policy.
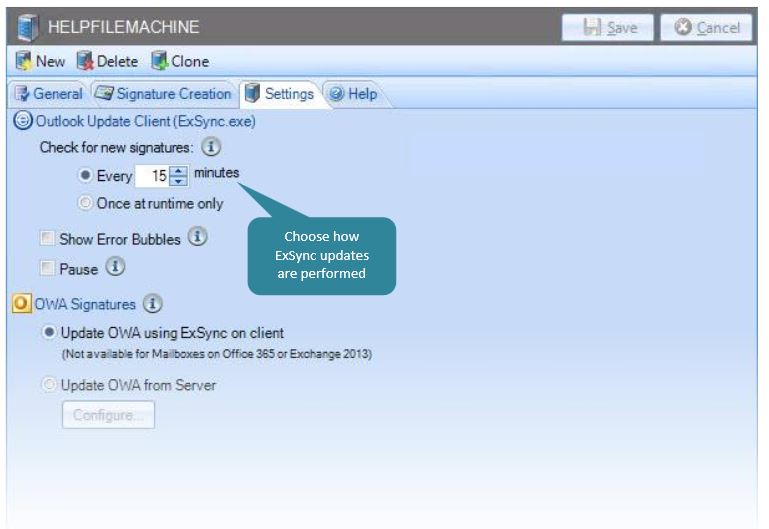
- Set the frequency with which ExSync should check for new signatures (in minutes) or choose to update Once at runtime only. Selecting Once at runtime only sets ExSync to update immediately and then to close down, whilst defining a set frequency updates at continuous intervals.
- Save changes.
Ensuring that ExSync runs automatically
For ExSync to function correctly, on each client machine, you need to ensure that it runs automatically.
To do this, you can use a logon script or GPO.
Deploying via a logon script
This method of deployment is useful if you already have a logon script, or if you wish to deploy Exclaimer Signature Manager Outlook Edition signatures to a select number of users for test purposes.
- Stage 1: Create new or update existing logon.bat.
- Stage 2: Set login.bat as the login script for required users.
- Stage 3: Ask users to log out and log back in
Stage 1: Create new or update existing logon.bat
If you do not already have a logon.bat file, you should create one now.To do this:
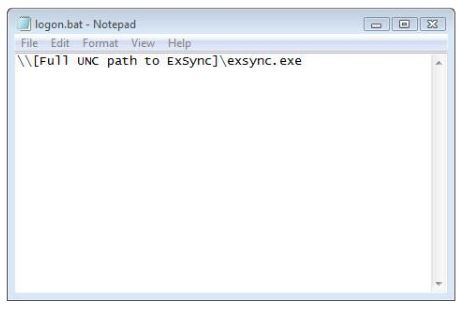
- Open Windows Notepad.
- Create a file named logon.bat.
- Enter the full UNC path to ExSync, for example: \\Server\Share\exsync.exe.
- Save the logon.bat file.
- Copy the logon.bat file to your shared NETLOGON folder.
Note: If you already have a logon.bat file, simply add the full UNC path to ExSync to it (for example \\Server\Share\exsync.exe) and save it to your shared NETLOGON folder.
Stage 2: Set logon.bat as the logon script for required users
If required, you can set logon.bat as the login script for each Active Directory user.-
Open Microsoft's Active Directory management tool, select Active Directory Users and Computers.
-
Locate the required user (in the directory structure).
-
Double-click the user name or right-click and select Properties:

-
Select the appropriate tab, in this case, Profile.
-
Enter logon.bat into the logon script attribute and click OK.
Stage 3: Ask users to log out and log back in
Ensure that your users log off and log back on at least once to activate the new login script.
Deploying via Group Policy Object (GPO)
This method of deployment allows you to deploy the login script using your default Group Policy Object (GPO) or to a GPO that you have created.
For clarity, this process has been documented in two stages:
Stage 1: Create new or update existing logon.bat / logon.vbs
If you do not already have a logon.bat file or a logon.vbs file you should create one now.
- Locate the logon scripts folder of the required GPO (in the Group Policy Object management console).
- Open the logon.bat or logon.vbs file. If neither of these files is present, create one.
- Add the script shown below into the BAT file:
-or-
- Add the script shown below into the VBS file:

- Save the logon.bat or logon.vbs file to the logon scripts folder of the GPO.
Stage 2: Propagate the New GPO
The new GPO is updated for each user when they log off and back on. If you need to propagate the change before this is possible, type gpupdate in the Windows run field on that user's computer.